| | SCI HOME PAGE | CATALOG | HOW TO ORDER | GREAT SPACE LINKS | FAQ | |
Hubble Space Telescope SCIENCE KIT Presentation Guide
IDEAS FOR SCIENCE FAIRS, CLASSROOM USE, CLUB ACTIVITIES, ETC.
| | SCI HOME PAGE | CATALOG | HOW TO ORDER | GREAT SPACE LINKS | FAQ | |
IDEAS FOR SCIENCE FAIRS, CLASSROOM USE, CLUB ACTIVITIES, ETC.
Photocopy all the Presentations on this sheet and cut them into individual Presentation Cards. Assign two or more participants to each of them, based on their preferences and abilities. Each participant should read the Fact Sheet containing Highlights of the HST Mission and the HST Spacecraft Description. Give each participant a copy of the appropriate card(s). Each group should also be armed with a good dictionary. Have the participants thoroughly read and discuss their Presentation Cards and plan the presentation carefully before beginning any construction. The coordinator should assist participants by providing workspace and time, helping obtain materials, and suggesting sources of information.
Caution: adult supervision is required for any use of an art knife.
Additional materials pertaining to the HST are available from various sources. The Coordinator should check the following:
For: 35mm Slide Sets, HST Bibliography, information:
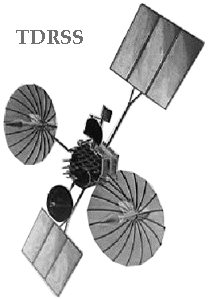
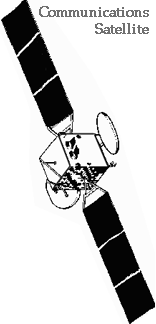
 Cut out the picture of a TDRSS satellite. Cut out the picture of the ground antenna station and the picture of a commercial communications satellite. Obtain a picture of a building to represent the Space Telescope Science Institute.
 Arrange these in your display, along with the HST model, to illustrate the HST, TDRSS, and communications satellite in earth orbit. Show communications between one of HST's High-Gain Antennas and one of TDRSS High-Gain Antennas (one of its large antenna dishes) by running a brightly colored string or thread between them. Similarly, illustrate communication between TDRSS and the ground station. Label the ground station White Sands, New Mexico, the TDRSS communication center.
 Show communication from White Sands with the commercial communications satellite, and from there to the building representing the Space Telescope Science Institute. If you have any images from the HST, you might want to show them in connection with the Institute.
Write up a sign explaining the display, using information included with the kit, and/or from outside references.
Assemble an HST space craft SCIENCE KIT model according to the instructions provided. Fashion a moveable tabletop stand for your completed spacecraft model, with a heavy base, which will allow some adjustment in the spacecraft's attitude. Or, arrange to suspend the HST model with thread so that it will remain stationary in the position you choose for your presentation.
Obtain a picture of Saturn or Jupiter, or a star group such as the constellation Orion. Place this on one of the walls of your display, and orient the HST so that it appears to be observing it. If you choose to show the edge of the Earth in the background, make it large enough that its curvature is apparent, but not extreme (refer to photos taken from the Shuttle during deployment). It should show that the HST is on the Earth's nighttime side.
If you have any appropriate images from the HST, you might want to place them in your display. Write up a sign explaining the display, using information included with the kit, and/or from outside references.
Obtain a picture of a distant galaxy, or an artist's conception of a quasar. Place this on one of the walls of your display, and orient the HST so that it appears to be observing it. If you choose to show the edge of the Earth in the background, make it large enough that its curvature is apparent, but not extreme (refer to photos taken from the Shuttle during deployment). It should show that the HST is on the Earth's nighttime side.
Write up a sign explaining the display, using information included with the kit, and/or from outside references.
Using a very sharp, pointed razor knife (X-acto #11 or equivalent), cut away about an inch-wide section from the side of your model's telescope tube and SSM, all the way down to the Primary Mirror, approximately as depicted in the cut-away view shown on the Fact Sheet. Also, cut away the side of the Secondary Mirror's Baffle, so that the Secondary Mirror is visible.
Arrange the telescope so that the inside is visible and well-illuminated. On a copier, make an enlargement of the Optical Path diagram from the Fact Sheet, and display it nearby. Optionally, you might also find it possible to illustrate the light path (as shown in the diagram) by using brightly-colored thread carefully attached to the model's optics, and supported somehow in your display.
Write up a sign explaining the display, using information included with the kit, and/or from outside references.
On the Aft Shroud of your HST Model, locate three black ovals (the Fixed Head Star Trackers). Just Forward of them you will see the rectangular section of the shroud which is part of the WF/PC. It measures roughly 1.5 x .5 inches, and contains a couple of smaller squares. With a sharp razor knife, cut out this rectangle.
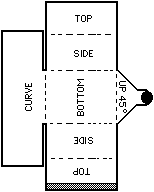
 Cut out the WF/PC from a hardcopy of this Presentation Guide, along the solid lines. Fold along the broken lines so that all the printing is inside. Glue the top together by applying glue to the shaded edge. Fold up and curve the rectangular section marked "CURVE" and secure it in place with glue. The black dot represents the cameras pickoff mirror which directs light from the HST into the camera. Fold its support up 45 degrees. The completed WF/PC should resemble the sketch provided below at left.
With the side marked "BOTTOM" facing aft, slide the WF/PC mirror-first into the hole in the Aft Shroud. When in place, sight down through the telescope tube and observe how the 45-degree pickoff mirror is visible through the hole in the Primary Mirror.
 Slide the WF/PC back out. Obtain a piece of thin, stiff, clear plastic such as that used to make overhead transparencies. Cut it into a small rectangle of the right size to fit into the rectangular hole in the Aft Shroud and support the WF/PC about an inch out, as though it is floating in freefall beside the HST, ready to be inserted into its location.
Write up a sign explaining the display, using information included with the kit, and/or from outside references.
| | SCI HOME PAGE | CATALOG | HOW TO ORDER | GREAT SPACE LINKS | FAQ | |