Build the Solar Sail Blades
- CUT OUT: Cut the large roughly-triangular part from one of the eight copies of Parts.pdf that you printed. Cut along the outermost thin black line. Since all the cuts are straight lines, you may find it convenient to use a paper trimmer to make the cuts. This requires extreme care to prevent injury. The part you have cut out is a Solar Sail blade. If your Solar Sail blade has a curl, bend it opposite the curl to flatten the piece as much as possible.
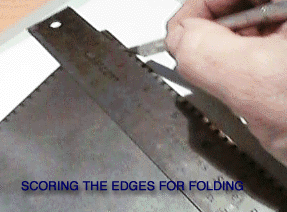
- SCORE FOR FOLDING: Place a metal straightedge along the thin black line near the edge of the Solar Sail blade that runs through all those little black rectangles. Using an art knife with a fresh new blade, score along the line, by moving the blade along the straightedge. Use only enough pressure to break the surface of the paper. Do not cut through the paper. In the same way, score the other two thin black lines near the other edges of the Solar Sail blade. Scored edges can be sharp. Be careful to avoid paper cuts.
- FOLD: Carefully fold back the three edges of the Solar Sail blade where you scored it, making a sharp, clean crease back away from the score. Adjust the folded edges so they are perpendicular with the face of the Solar Sail blade.
These folded edges represent the inflated tubes that support the thin material of the Solar Sail blade. On the spacecraft, the Solar Sail blade material is aluminized mylar, only 5 microns thick, with rip-stop reinforcement. This is far thinner than the card stock in your scale model. The inflated tubes, around the sail's perimeter, are made of 20-micron thick material. One entire Solar Sail blade has a mass of less than 3 kg (6.3lb), even though it is 15 meters (49 ft) long!
- PAINT: (Skip this step if you used metallic-clad card stock.) Arrange all the blades together on a work surface with folds facing down. Give them a light coat of spray paint, aluminum or silver color. Keep the spray can about two feet away and let only a fine mist settle onto the blades. Don't apply enough to wet the blades, or to mask the black markings. Only a very light coat is needed. Wait till the paint is dry before proceeding.
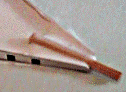
- Cut a piece of a thin bamboo skewer (or similar material) to 1 inch in length. Place this in the apex of the long triangular Solar Sail blade, between the folded edges, as shown. This will be called the blade Connection Rod, for purposes of building the model. Let 3/8 inch of the blade Connection Rod protrude past the Solar Sail blade. Apply white glue generously to secure it in place. Make sure the glue flows all around: it must be strong enough to support the weight of the Solar Sail blade when dry.
 The blade Connection Rods do not exist on the spacecraft. Instead, the inflated support tubes bend into a U-shape where they attach to a mechanism which can be commanded to articulate them in a twisting motion.
- Apply white glue to the other corners of the Solar Sail blade, where the folded edges meet, gluing the edges together. Wait for the glue to dry thoroughly before proceeding to the next step.
- Repeat the above steps to make seven more Solar Sail blades. If friends or family are helping, making the rest of the blades would be a good opportunity for them to participate.
On to the Next Step...
BACK TO THE SCALE MODEL HOME PAGE

|
