*
2. ASSEMBLE THE SPUN BUS.
View the whole assembled model
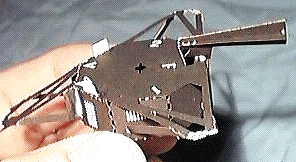
- From sheet C, release the long, 8-segment SPUN BUS. Bend into an octagon, with the printed details outside, by pinching a crease into each of the 7 vertical hinges. Position the tab at one end of the BUS between the ears at the other end. Bend it over and glue.
- Find a hinged tab labeled with an arrow on the SPUN BUS. Bend it over, toward the inside of the octagon. Bend the 7 adjacent tabs over also. Release the BUS SUPPORT from sheet B, and position it up inside the SPUN BUS, to hold its shape. Glue the bent tabs to the BUS SUPPORT. This is now the BOTTOM of the SPUN BUS.
- Bend down the eight tabs on the remaining (top) side of the SPUN BUS toward the center, forming a shelf at right angles to the walls of the bus.
- From sheet C, release the BOOM SUPPORT STRUCTURE. Keep the side with the printed letters facing UP. There is a long, wedge-shaped member hinged at point F. This is half of the STAR SCANNER. Bend straight up at hinge F. Bend 90 degrees down and out at hinge G.
- Glue the BOOM SUPPORT STRUCTURE onto the top of the SPUN BUS so that the SCIENCE BOOM support (at hinges A-A) points straight out from the bay marked S. Align the corners marked 1 and 2 with the corners of the SPUN BUS so it centers nicely. Allow the glue to dry.
- From sheet A, release the part labeled STAR SCANNER. Hold it with the small rectangular protrusion points downward. Slide it together at right angles, slot into slot, with its other half (marked G) on the BOOM SUPPORT STRUCTURE. Secure with glue, keeping the outboard ends even and perpendicular. Apply glue where it meets the SPUN BUS top.
- The trusswork protruding from A-A is the SCIENCE BOOM SUPPORT. Bend it down as far as it will go to make a crease at A-A. Lift it up again, and bend its two triangular side trusses down at right angles to the center portion. Bend the SCIENCE BOOM SUPPORT down again, and glue the ends of the triangular trusses to the SPUN BUS where they touch, below each A.
- Find a small crosshatched bar at the end of a roughly triangular structure marked 2. Fold down the two white-tipped arms which are hinged to the crosshatched bar. Each tip will approach a small round hole in the SPUN BUS. Insert the white tips into the holes. Secure with glue.
- Repeat the above step with the structure marked 1.

- Fold up both white tabs protruding out from the BOOM SUPPORT STRUCTURE, and apply glue to fix them pointing 90 degrees up. These represent two science instruments, the EUV and HIC (see fact sheet).
- Release the two halves of the HGA SUPPORT from sheet C. Slip them together, slot into slot, at right angles. Insert its crosshatched cross-tab down into the + slot in the top center of the SPUN BUS. Secure with glue.
| GO ON TO THE NEXT STEP |
| INSTRUCTIONS FIRST PAGE |
| SCI HOME PAGE |
