*
6. ASSEMBLE THE DESPUN SECTION.
View the whole assembled model
- Release the large DESPUN SECTION 1/2 from sheet C. Fold a right angle crease into hinges B and C, folding so the letters remain inside. Tab D goes into slot E. Secure with glue.
- Release the DESPUN SECTION 2/2 from sheet C. Carefully trim away any remnants of the release points (but don't trim off hooks K). Slide its slot F all the way into slot F of DESPUN SECTION 1/2 at right angles, and secure with glue.
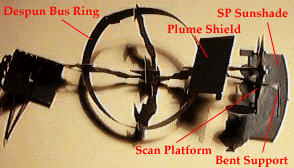
- Release the DESPUN BUS RING from sheet B. Slide it through slots K and over hooks K on the DESPUN SECTION, and insert the end tab into the slot on the other end. Apply a very tiny drop of glue to join them - not enough glue to make the paper soggy. When that dries, adjust the ring into roughly a circle, and secure with glue where it contacts the DESPUN SECTION. Use only very tiny drops of glue, and place them only near the edges, so the DESPUN BUS RING does not get soggy, which would cause it to lose its circular shape.
- Release the circular RRH ANTENNA from sheet B. Apply glue between the white line and the V-slot. Pull the other side of the V-slot over onto the glue so the circle bends up into sort of a cone. Work the cone to make it fairly symmetrical.
- Locate the Subreflector on the DESPUN SECTION 1/2:

- Place the RRH ANTENNA's center slot over the Subreflector on the DESPUN SECTION. The dish antenna should nest up against the curved support at the base of the Subreflector. Adjust the RRH ANTENNA to be perpendicular to the Subreflector. Secure with glue.
- Release the SCAN PLATFORM from sheet A. Fold a right angle into the hinges supporting the two circles and two rectangles at one edge. Fold down away from the gold foil. Fold the largest circular piece back the same direction.
- Snap the central hole in the SCAN PLATFORM over the tip of the small white triangular tab on DESPUN SECTION 1/2. Keep the gold foil facing out. Twist the white triangular tab to keep SCAN PLATFORM in place. The SCAN PLATFORM is free to rotate on its support. If you don't want it to rotate, secure with glue.

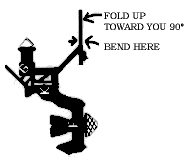
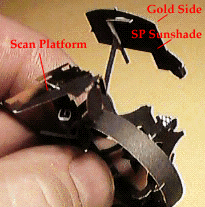
- On the DESPUN SECTION 1/2, find the long thin support arm out over the SCAN PLATFORM. Hold the DESPUN SKETCH: SP SUNSHADE SUPPORT ARM SECTION 1/2 with the lettering facing up toward you. Fold the support arm in half, bending it upwards toward you.

- Release the S/P SUNSHADE from sheet A. Bend down the tiny black triangular tab 90 degrees away from the gold surface. Set black side down, on top of the support arm you just bent into an L, and glue.
- Release the S/P PLUME SHIELD from sheet A. Hold the DESPUN SECTION so the letter G is facing you, and is upright. Find the small straight support arm just to the left of the G. Center the S/P PLUME SHIELD flat onto the left side of the support arm and glue, holding at right angles until the glue dries. The small black tab on the S/P PLUME SHIELD faces toward you, on the inboard edge.
Here's a view of the completed DESPUN SECTION:

| GO ON TO THE NEXT STEP |
| INSTRUCTIONS FIRST PAGE |
| SCI HOME PAGE |


