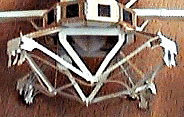
5. INSTALL THE ROCKET ENGINE MODULES (REMs).
View the whole assembled model
- From sheet A, release one REM SUPPORT. Fold a crease into each of its four struts along the hinge. Two of them are gold-trimmed. Fold all of them back away from the side with the gold. It may help to fold them over a straightedge such as a metal ruler. Adjust each crease to about a 90-degree fold.
- Repeat the previous step for each of the other three REM SUPPORTS.
- Hold one REM SUPPORT so its large rocket engines are pointing downward, gold trim facing you. Fold the crosshatched top tab back away from you at its hinge. Fold back the top two supports along their common hinge above the large rockets. The other two struts fold back at their hinges. As you fold one back, a small gold rocket engine pops out, facing off to the side. Using a toothpick, bend the other rocket engine nearby (which is a tiny gold rectangle) out 90 degrees facing the same way.
- Repeat the previous step for each of the other three REM SUPPORTS.

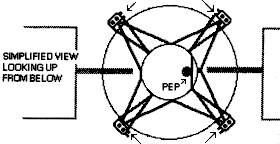
- Set the four REM SUPPORTS on a table, oriented the same. Notice the two small gold-covered rocket engines face one way on one pair of REM SUPPORTS, and the other way on the other pair. When installing the REM SUPPORTS, plan to pair the REM SUPPORTS so that these small rocket engines will face each other on the sides away from the solar panels, as shown in the diagram.
- With the above orientation in mind, pick up one REM SUPPORT, and, with the large rocket motors facing down, insert its crosshatched tab over the corner of the PM TRUSS, where it holds a SPACECRAFT BUS tab. The two remaining gold-trimmed REM SUPPORT struts should be pointing down roughly toward the apexes of two PM STRUT triangles. Insert the tab at the end of one strut into the hole closest to it in the apex of the PM TRUSS. It might help to bend the tab inward a bit first. Repeat with the other strut, and secure with glue at each point of contact. Keep glue out of the remaining apex hole, for the other REM SUPPORTS.
- Repeat the above step for each of the other three REM SUPPORTS.
- Find the long tab marked X pointing inward from one of the rocket engine modules. Making a crease in the strut attach points marked by black lines, bend tab X upward up and insert its tip into slot Y. Bend down the end with two tiny rocket engine tabs as you bend the tab up. Once in place, twist the tab to hold it in slot Y and secure with glue.
- Repeat the previous step for each of the other three REM SUPPORTS. Adjust all the struts and rocket engines to be relatively straight and symmetrical.

| GO ON TO THE NEXT STEP |
| INSTRUCTIONS FIRST PAGE |


