Connect all the Blades
- Take one Solar Sail blade, and insert its blade Connection Rod into one copper tube opening on the copper hub. Initially at least, the edge folds should face in the same direction as the display-suspension wire loop on the copper hub.
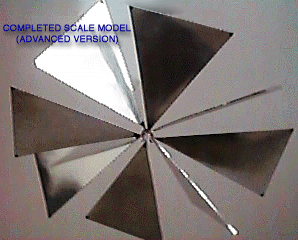 The fit should be snug enough that the blade Connection Rod and its Solar Sail blade do not fall out. It should be possible to twist the Solar Sail blade in the copper hub by handling the card stock.
If the fit is too tight, use fine sandpaper to reduce the thickness of the blade Connection Rod. If it is too loose, use long nose pliers to squeeze the copper tube slightly.
- In a similar manner, insert the seven remaining Solar Sail blades into the copper hub.
The copper hub in your model represents the central part of the spacecraft, where the solar sail blades connect to their articulation mechanisms. This is where they were stored rolled up, before inflating and deploying to their full size in flight. The spacecraft's central section is illustrated here.
- The Solar Sail blades may now be twisted to simulate how the spacecraft operates in flight. Details of space flight operations are given on a later page in this site. For now, leave the blades twisted so that they are all flat in nearly the same plane, with the edge folds facing the same direction as the display-suspension wire loop on the copper hub.
On to the Next Step...
BACK TO THE SCALE MODEL HOME PAGE

|
