*
4. ASSEMBLE THE RTG BOOMS.
View the whole assembled model
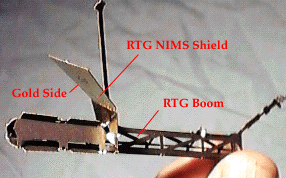
- Release RTG BOOM 2 from sheet A. With gold up, fold down the truss panels on either side of the gold-covered center panel. It becomes triangular in cross-section, and fins pop up on the RTGs. You'll notice two tabs can be inserted into two slots to hold the shape. Insert them, fold them over and secure with glue.
- Glue the struts which have crosshatched ends together along their whole length. Bend the pop-up fins back a bit so they stand out more prominently.
- A single strut remains (the LGA-2 boom, see fact sheet). Bend it slightly at its base so it stands straight out from the tringular truss, in a plane perpendicular with the gold.

- Release one RTG NIMS SHIELD from sheet A. Notice two tiny notches, one in each side. Make a crease along an imaginary line connecting these notches. Adjust so the shield is bent, gold towards gold, about 30 degrees. Fit the V-shaped notch up over the RTG where it meets the boom, and secure with glue. Gold faces outboard.
- Release RTG BOOM 1, and the other RTG NIMS SHIELD from sheet A. Repeat the assembly procedure.
| GO ON TO THE NEXT STEP |
| INSTRUCTIONS FIRST PAGE |
| SCI HOME PAGE |
