*
5. ASSEMBLE THE RETRO PROPULSION MODULE.
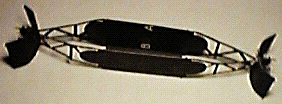
View the whole assembled model
View Galileo's Retro Propulsion Module
- Release the RETRO PROPULSION MODULE (RPM) from sheet C. Also release the four RPM TANK HALVES from the same sheet. With the letters SBA facing up, insert the tabs of each TANK HALF at right angles down into the slots on the circular tanks on the RPM. Secure with glue, making sure each tank half sits centered and at right angles to the RPM. Let the glue dry.
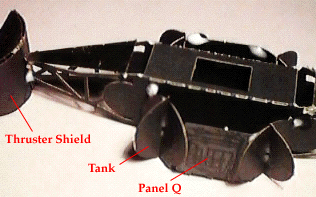
- Clip off each of the tabs of the TANK HALVES where they protrude through their counterparts of the RPM. Leave the two square panels marked Q where they are, out of the way for now. Fold each tank inward, toward the central panel with two white lines to put a crease in its hinge. Keeping the tanks in this position, moisten their hinges with glue and let dry. This is intended to make the tanks want to spring inward to ease further assembly. See the photo at the bottom of this page.
- Release the THRUSTER BOOMS from sheet C. Fold a right-angle crease into the hinges marked B, keeping printed letters on the inside. Apply a little glue to one of the C marks, and squeeze both C marked ends together at one end of the assembly. Keep the assembly even, that is, if you force the two A-marked panels apart, the joined C-marked end is centered between the A panels. Do the same with the C marks at the other end of the Assembly.
- Release a THRUSTER SHIELD from sheet A. Fold a right-angle crease into the hinge supporting the gold semicircle, so that the gold faces outside. Bend a curve into the remaining sides, so they surround the gold top. The result becomes nearly half of a gold-topped cylinder. Apply small amounts of glue to hold the tips of the gold semicircle to the curved shield. Let the glue dry.

- Repeat the previous step with the other THRUSTER SHIELD from sheet A.
- Place the two THRUSTER SHIELDs gold-side down on your work surface. Hold the THRUSTER BOOMS assembly open-side up, and set it down into the slotted THRUSTER SHIELDs as indicated. All of the structure at the C-marked ends, up to and including an L-shaped member, fits inside the half-cylinder of the THRUSTER SHIELDs. Straighten up the pieces and secure with glue. Let the glue dry.

- Release an RPM SUNSHADE from Sheet A, keeping as much as possible of each release point attached to the part. Position it over the top (gold side) of one end of the THRUSTER BOOMS assembly, with its tapered end facing outboard. Its outboard end should rest against the THRUSTER SHIELD. Glue in place, and repeat with the other one on the opposite boom.
- On the RPM, bend both square panels marked Q up and in toward the center panel, while adjusting the tanks to be outside the Q panels.
- On the RPM, lift the four tanks to a vertical position, and apply some glue along the two parallel white lines. Keeping the Q panels and tanks out of the way, set the THRUSTER BOOMS assembly down onto the RPM such that edges marked A contact the glue along the two white lines on one side of the RPM. Center it. The four tanks should be pressing up against the THRUSTER BOOMS assembly walls.
- Apply a little glue where each of the four tanks contacts the THRUSTER BOOMS walls. Let the glue dry.

- Move the two square panels Q perpendicular to the base of the RPM. This pushes them into the tanks, which will hold them in place. Apply glue where the panels Q meet the tanks.
| GO ON TO THE NEXT STEP |
| INSTRUCTIONS FIRST PAGE |
| SCI HOME PAGE |


